After spending the bulk of the pandemic working on my kitchen table (much to the frustration of all the inhabitants of the flat), I decided it was time to move onto a proper desk. After digging through all kinds of options I came to a few conclusions:
- I wanted something I’d enjoy working at, ideally with a solid wood surface.
- It needed to have a reasonable amount of space, and be sturdy enough to not wobble.
- It needed to be on budget, and that basically excluded any of the pre-made wood slab desks.
- Most of the cheap options from places like ikea didn’t fulfil any of the above.
Hence I came to the conclusion that I’d like to make my own. You can read more about buying the wood in that separate post, but this article is about actually building the desk.
Design#
I knew I wanted a slab top, and for it to be fairly thick. I quite like to have the screens roughly arm length away and so that meant roughly 80cm deep. On width, generally wider is better, but the good sections of the slabs I bought allowed me a clear 150cm width. Initially I scoped out going even wider, out to perhaps 170cm, but when compared to the size of the room, I think it would have been totally overkill.
The design was relatively simple - I wanted the desk to look substantial and show off the beautiful oak grain, whilst also being sturdy enough to not wobble (important for a work desk). For the legs, I opted again for reclaimed fence posts from peckham reclamation , but this time built them into frames using mortise and tenon joints. This would give me the stability I needed whilst keeping the rustic aesthetic.
The plan was to join two oak slabs side-by-side to get the depth I wanted, reinforce them from underneath with metal bars, and then attach leg frames at each end. A removable cross piece at the back would provide additional stability and also serve to hide cabling.
Preparing and joining the slabs#
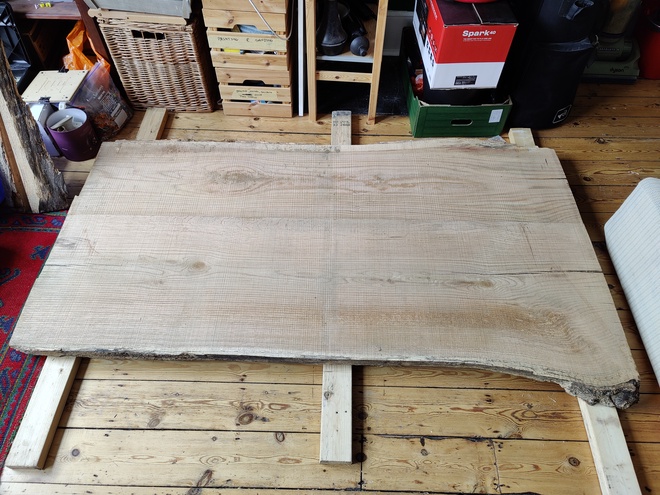
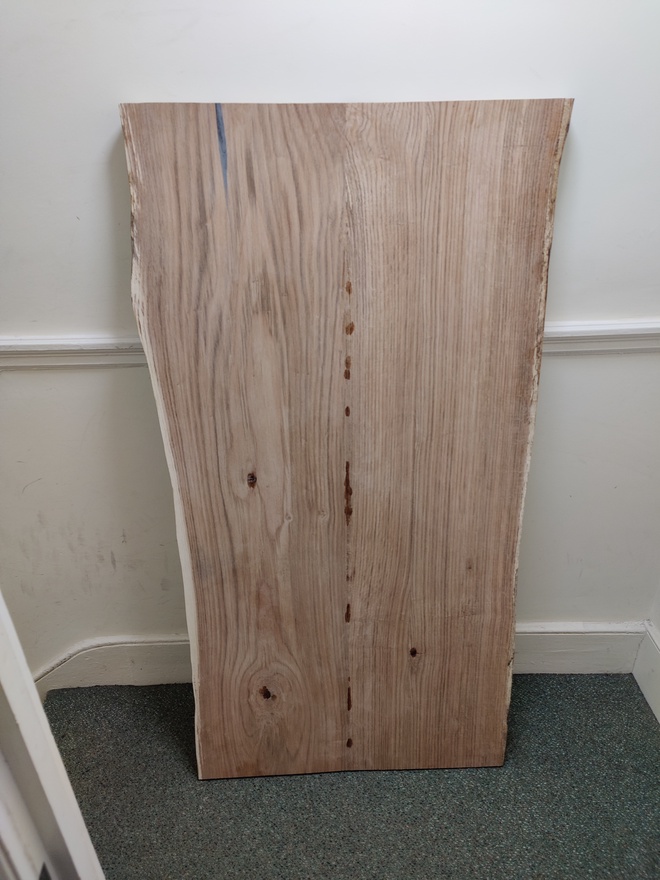
The oak slabs came rough-sawn from the sawmill, so the first job was to plane them smooth and trim them to size. Oak is significantly harder than the cedar I’d used for the bench, which made this more time consuming, but the grain was excellent once planed, and provided I went with the grain (harder on the knots), potentially easier to work with.
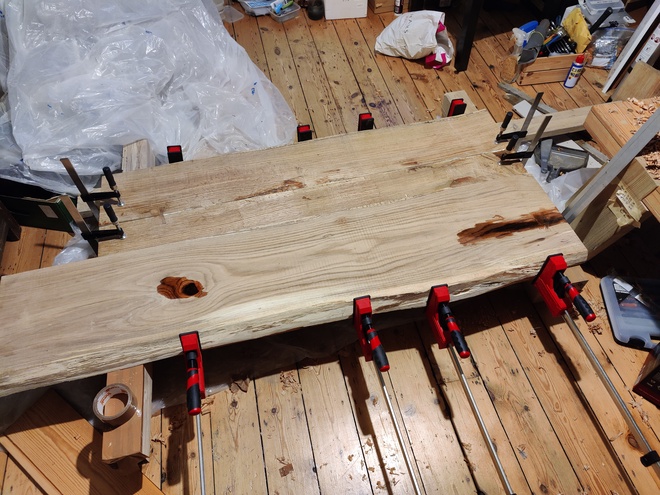
To join the two slabs, I needed them to be as flat as possible where they met. After carefully planing the joining edges, I did a test fit and then glued them together using wood glue, joining biscuits and plenty of clamps. The key here was to work quickly once the glue was applied, and to make sure everything stayed flat and aligned whilst the clamps were tightened. While I’d originally intended this to be just two slabs joined, one of them had a crack down the middle, and I wasn’t going to get quite enough width while still avoiding that crack. In the end I opted for three sections, two edges with their original edge, and a middle section planed on both sides.
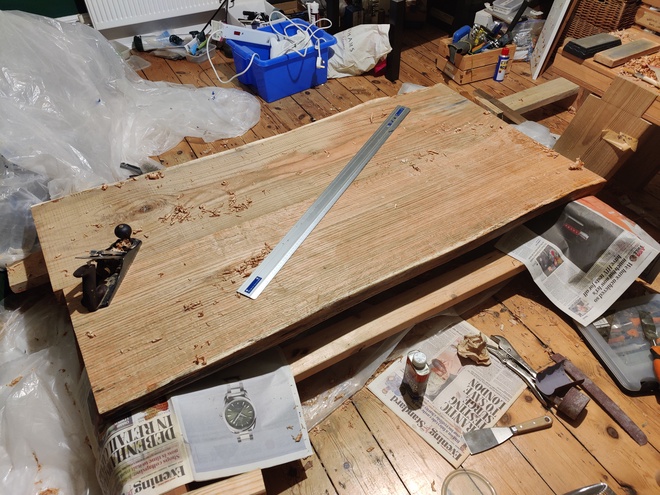
Once glued, I could trim them to size and plane them for a first good view of the grain.
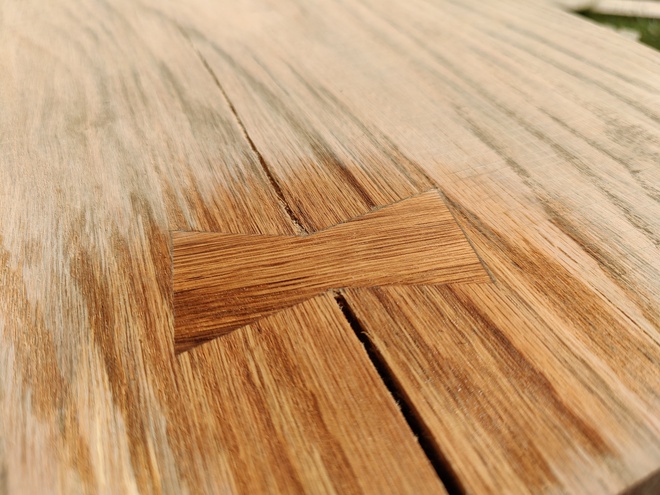
Bow ties and void fill#
Oak being a natural material, there were various small cracks, voids and imperfections that needed filling. I used clear epoxy resin for this, applying it carefully to avoid making it too obvious. For some of the larger features, I added wooden bowties - both for structural support and as a decorative element (and partly to see if I could!). Annoyingly, when trimming the slabs to deal with the crack that I found (as mentioned above), the bowtie ended up best positioned on the underside and also had one end trimmed off. It’s job is structural so that’s theoretically fine, but it is a shame that it isn’t visible during use.
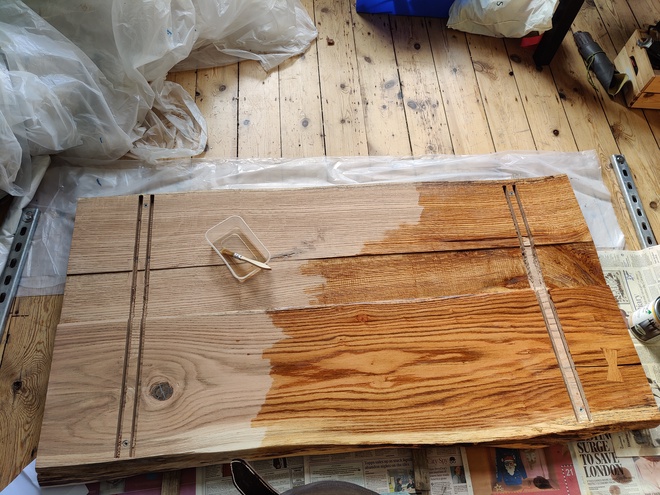
Once the bulk voids were filled with epoxy, I came back and filled any remaining small voids with spot epoxy before sanding smooth. Starting right down at 80 grit to remove the bulk of the material and working up to around 220 grit. I tried really hard to get a flat surface and while it’s pretty close, there’s still a small dip in the middle of one side. Thankfully visible only if you know it’s there!
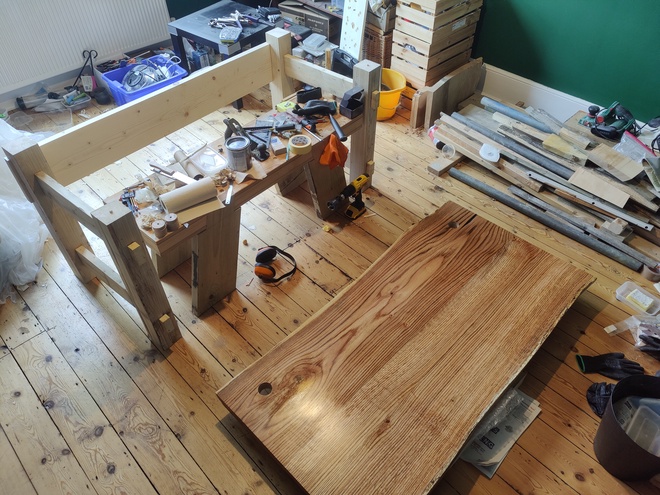
Building the leg frames#
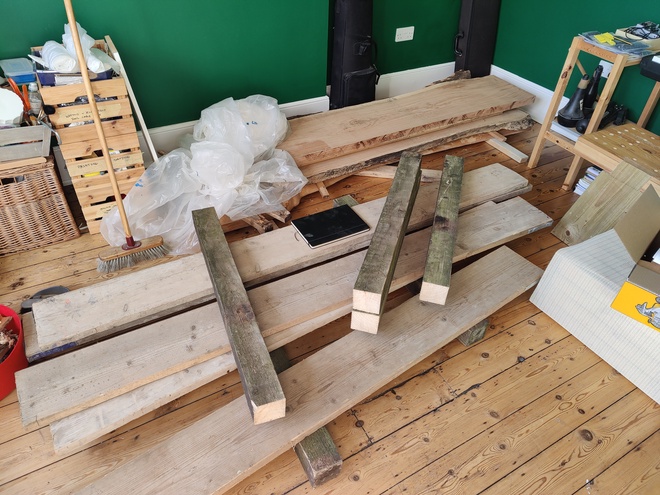
For the legs, I used the same reclaimed fence posts as I’d used for the bench. These needed quite a bit of preparation - trimming to length, filling voids with epoxy, and then planing and sanding smooth.
I built the legs into square frames using mortise and tenon joints. This involved cutting tenons on the crosspieces and corresponding mortises in the vertical leg pieces. I really wanted a rock-solid joint that won’t wobble even under heavy use, so really tried to keep the fit very tight, meaning that even after cutting by hand, it needed significant effort to pound the cross pieces into the holes with a mix of mallets and clamps.
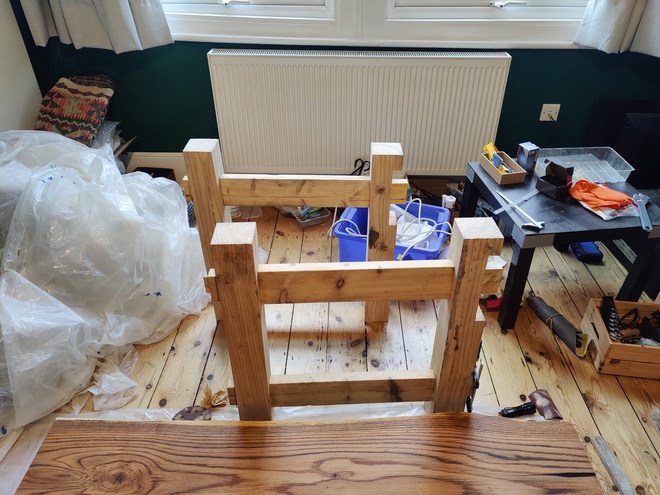
The cutouts on the upper side are for the back stabiliser for the leg frame. That will be detachable and run along the rear of the desk for lateral stability.
Stiffeners and Oil#
Once the glue had fully cured, I cut slots to install metal stiffening bars on the underside. These run perpendicular to the join and help prevent the desk from warping over time, whilst also adding extra strength to the glued joint. The bars sit in shallow grooves so they don’t protrude from the underside. Given the underside wasn’t even close to flat (as some of the glued sections of slabs had different thicknesses by the end), I only sanded it back to around 100 grit and then oiled it by hand.
The oil I’m using is Osmo Wood Wax Finish Extra Thin, which as it says on the tin, is very thin and easy to apply. This also means it’s great for getting into all the crevices and doesn’t make the epoxy sections look too obvious.

As for the upper surface, I sanded up to 220 grit and added several coats of the same thin oil. I think I went a bit mad, slowly running my fingers over the surface for rough spots, re-sanding and then more oil. In retrospect, I probably should have done a more thorough sanding job in the first place, which would have meant less rework later.

Final assembly#
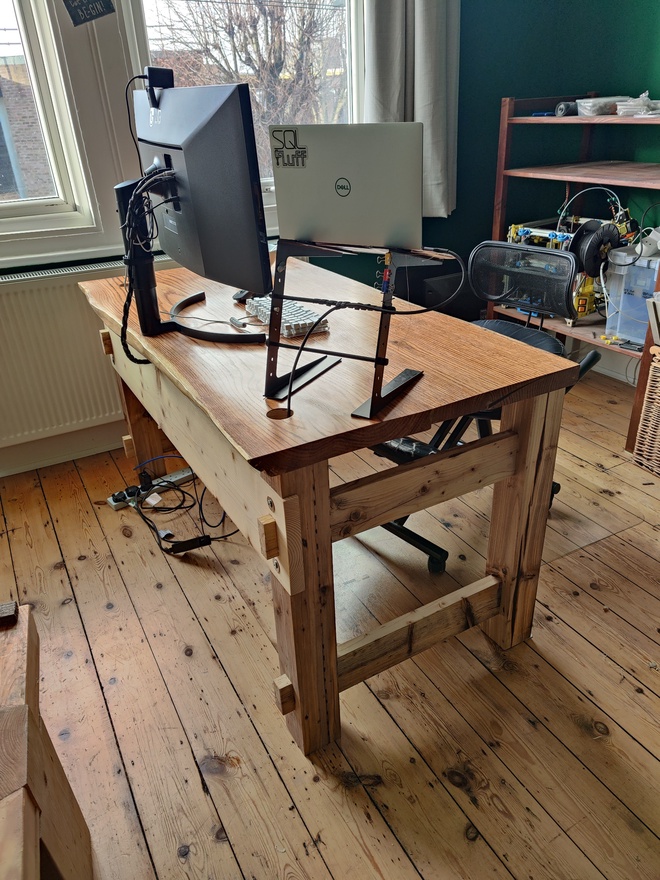
With both the top and the leg frames complete, it was time for final assembly. The leg frames attach to the underside of the desk top using long bolts, which allows for some adjustment and also means the desk can be disassembled if needed for moving.
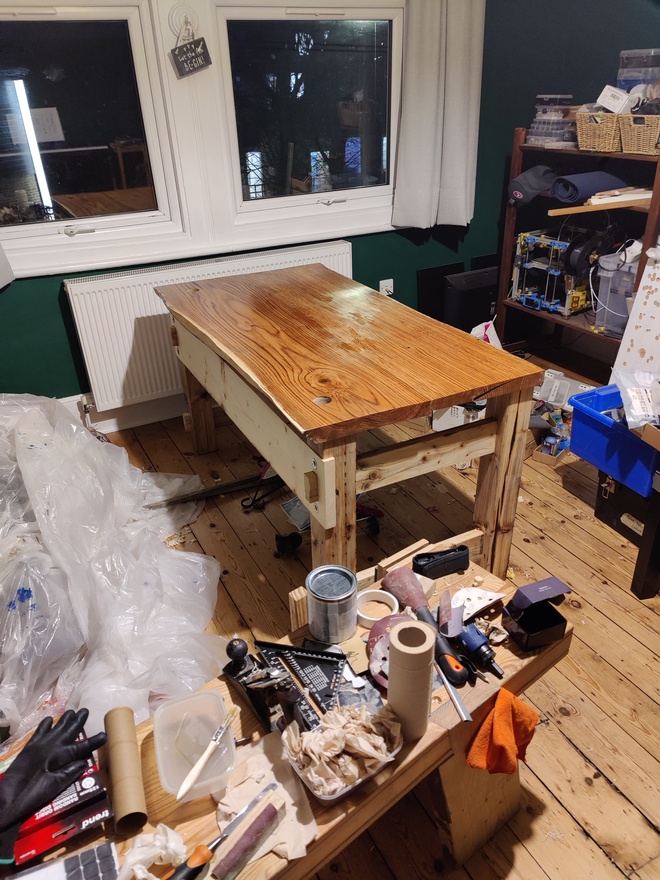
The final piece was the long cross member at the back - a reclaimed scaffolding board that bolts between the two leg frames and provides additional lateral stability. Crucially, it’s also removable, which means the desk can be disassembled into manageable pieces for moving. As a bonus, it sits at just the right height to hide power cables and provide some cable management.
The eagle-eyed among you will see two large holes drilled through the slab in the back corners, which are for cable management, and set me up nicely for the next phase of the project which is to fix scaffolding poles through them for a fixed backplane.
Summary#
This project took me significantly longer than the bench - partly because oak is much harder to work with than cedar, but also because the design was more complex with the glue-up, metal reinforcements, and leg frame joinery. That said, I learnt a huge amount from building the bench first, and many of those lessons (especially around epoxy filling and finishing) transferred directly.
The result is a desk I absolutely love working at. It’s solid, doesn’t wobble, and the oak surface has developed a lovely patina from daily use. The fact that it can be disassembled for moving was definitely a good call - this thing is heavy.
Very pleased with how this turned out, and it’s been my daily workspace ever since.